Overview
Users can use the HIEv to ‘publish’ data, that is, make data available publicly outside of the HIEv. Making your data available in this manner may be required by your funding body or, and which is becoming much more commonplace today, by journal publishers . Besides the requirement to making your data more openly available in these circumstances, there are many benefits to making your data available to the global community, in particular by encouraging collaboration as well as increasing the visibility and reach of your own research.
Publishing your data from HIEv ensures that:
- You will receive a fully citable DOI for your data
- Your data will be stored on and be retrievable from the University data repository (managed by the Library team)
- Your data will be advertised on ‘Research Data Australia’ (http://researchdata.ands.org.au), where it can be discovered by the global research community.
Example
Data citation: Crous, Kristine; Ellsworth, David; Ósvaldsson, Anna (2016): CO2 response curves and leaf nutrients in fertilised and unfertilised trees adjacent to FACE plots in mature Cumberland Plain Woodland at Western Sydney University during a 3 year period (2011-2014). Western Sydney University. http://doi.org/10.4225/35/5809329aeb581
DOI: http://doi.org/10.4225/35/5809329aeb581 (leading to the dataset landing page at Western Sydney University)
‘Research Data Australia’ entry: https://researchdata.ands.org.au/co2-response-curves-2011-2014/789349
Instructions
To publish data HIEv collects together all individual files into a single data ‘package’ (or dataset) , that is then published alongside metadata describing that dataset. The steps required to publish your data from HIEv are outlined below:
** Note – it is recommended that you get in touch with the HIE data manager who can help you with the steps involved in publishing your data.
1. Upload individual data files
If not already done so, upload all individual files that will be part of the data package. See the ‘Uploading/Editing’ page for instructions on how to do this. It is worth repeating here the importance of fully documenting each individual file as, not only does it help locate individual files within HIEv itself, the information provided at each file level is included within the data package being published.
2. Package together list of files required in the collection
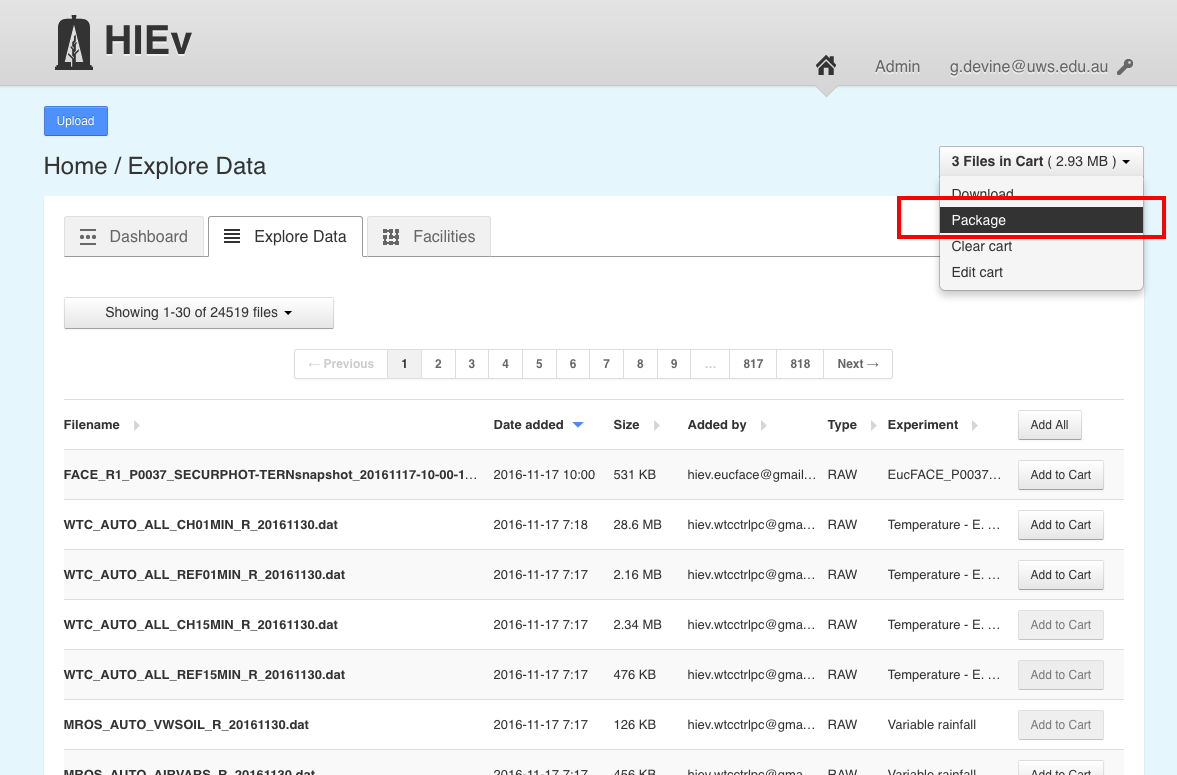
Once all files to be included in your data package are uploaded to HIEv, they need to be added to the cart. Use the search button to identify your files and use the ‘add to cart’ button adjacent to each file to add that file to the cart (make sure you have cleared the cart of any files before beginning this process). Remember that including data uploaded/created by another researcher in your dataset must be in agreement with that researcher, as per the HIEv data policy. Once all the relevant files have been added to the cart, click the dropdown menu on the top right and press ‘Package’:
3. Describe your dataset
Once you press the ‘Package’ button you will automatically be taken to the ‘New Package’ page:

You can use this page to fully describe your dataset (i.e describe the collection of files as opposed to the individual files) and provide metadata that will make it both discoverable and reusable by other users of your data. The fields to be filled out are listed below.
** It is important to note at this point that a dataset, whilst it may be intrinsically associated with a journal publication for example, is a resource in its own right and should be documented as such (i.e. try to avoid titles such as ‘Dataset associated with journal publication XX’, instead give a title that describes what the dataset actually is and what it represents).
- Filename – This is the name that will be given to the individual package of files (all files included in the data package are zipped up into a single file during the publishing step). Unlike individual files that are uploaded into HIEv, where users are recommended to follow a naming convention, no conventions are in place for naming data packages. Therefore it is up to the user to decide on a sensible name for their data package.
- Title – This is the main title for the dataset, and should summarise what the dataset entails. A current example is “Growth, leaf photosynthesis, leaf stem and root respiration, temperature, humidity, and photosynthetic photon flux density data for a glasshouse temperature experiment with Eucalyptus tereticornis”.
- Experiment – Use the dropdown box to select the Experiment that the dataset is associated with.
- Description – As with individual files uploaded to HIEv, try and give a detailed and complete description of the dataset. This could include for example, the context behind the dataset, how the data was generated, what the data (as a collection) shows etc.
- Start Time – In certain cases, HIEv will be able to determine the start (and end) dates/times of the included data. However, this will not always be the case so users should specifically indicate the start date/time of the data using the available widget
- End Time – As with 5 above, but for the End date/time of the data.
- Tags – Decide if you want to ‘tag’ your dataset as ‘Gap Filled’, ‘Photo’ and/or ‘Video’ to aid finding this dataset in HIEv
- Labels – This maps to ‘keywords’ for the eventual published datasets and can help in the discovery of your dataset once it is in the open domain. Labels/Keywords should broadly identify the domain of your dataset, e.g. ‘Eucalyptus tereticornis’, ‘Photosynthesis’, etc.
- Creator – By default the person currently logged in is identified as the ‘creator’ of the dataset. However, this can be changed using the dropdown box to another user (who must have an account on HIEv). This allows HIEv users to aid the creation of datasets where they may not necessarily be the primary creator of the dataset itself (the logged-in user will still be stored under the background ‘added by’ field, irregardless of who is identified by the ‘created by’ field).
- Contributors – You can use this text box to list any contributors (besides the primary creator) to the dataset being published. As contributors may be from any instituion, not just HIE (and thus may not have an account on HIEV), this field is ‘free-text’. To add someone, type in the details of the person and press ‘Enter’ on the keyboard to store that person as a single contributor entry. There is no set format to how you enter a contributor details, but typically a name, affiliation and email address is suffice, e.g. “Prof John Smith, University of Queensland, j.smith@uq.edu.au”.
- Grant Numbers – Supply any grant numbers that are associated with the project(s) under which data in this dataset was collected.
- Related Websites – Enter any web addresses that are associated with or may further help understanding of the dataset being compiled. **Note – you must include the preceeding ‘http://’ or ‘https://’ as part of the web address.
- Access Rights Type – Different access rights can be given to the dataset once it has been published. Whilst it is recommended that data access is marked ‘open’ (and thus freely downloadable under the terms of the attached license – see next point), there will be occasions where access to data is ‘conditional’ on some agreement between creator and data downloader, or where access to data can not be given (for IP/sensitive data reasons etc).
- License – Allocate a license to the dataset. The different licenses and what they represent in terms of data reuse can be found here: https://creativecommons.org/share-your-work/licensing-types-examples/. It is highly recommended that you select ‘CC-BY: Attribution’ here in the interests of maximising the reuse of your published dataset.
- ‘Run in background?’ – In generating your data package for publication the HIEv will bundle up all the files that you have added to the cart into one single zip file. By default, HIEv will do this as a background process thus freeing you up to continue with other tasks on the HIEv interface. You will receive an automated email when this process has been completed. If however you want to create the data package there and then (and you only have a small amount of data to be zipped together, feel free to uncheck this box).
At this point, you should review your entries to ensure you have entered everything correctly and in as much detail as possible. Once you are happy with the information provided click on the ‘Create Package’ button.
4. Publish
Assuming that the data package was successfully created and is appearing in the HIEv file listings, it can now be published. Users of the HIEv can not explicitly publish compiled data packages themselves. Instead, you must contact the data manager who will review the data package created and who will then forward it for publication.
Typically, publication of your dataset can take up to a week at this point (though sometimes it can be much sooner). For those researchers publishing data to coincide with a journal publication, it is important that you plan any necessary data publication in advance. Once the dataset has been officially published you will receive a DOI and a link to the dataset landing page on the University repository.