In addition to downloading data, HIEv also enables users to upload their own completed datasets and is a principal mechanism by which HIE researchers can effectively share their data with other members of the institute. Making your data available in this manner helps increase the visibility of your own research, whilst maximising the reuse and potential impact of that data and as such you are highly encouraged to upload your completed datasets into HIEv at the earliest practical time. Ideally upload of your research data would become a regular step in your research workflow.
Preparing data
Before uploading data into HIEv however, you need to first ensure that that data is in a format suitable for reuse. Whilst HIEv will accept most uploaded files, irrespective of how that data is structured or named, it is important that you prepare data in advance of upload so that data can be easily discovered and understood by others and reused to its maximum capability.
A set of guidelines exists for how to structure data before being uploaded into HIEv and can be found under the ‘Data Protocols’ tab under the ‘HIEv’ menu. Key points to consider from the guidelines:
- Data being uploaded into HIEv should be in a `completed’ state. That is, it should no longer be under active modification (cleansing, further processing etc) and its current state is expected to persist into the future. Evolving datasets, for example timeseries data where new data is appended each day can be handled in a special manner. To get further advice on this type of data, please contact the HIE data manager.
- Users should aim to save their data in a standardised, non-proprietary format (CSV as opposed to Microsoft Excel format for example)
- ‘File Naming Conventions’ exist for each facility. It is expected that files uploaded into HIEv will follow these conventions. A list of current naming conventions as well as their breakdown can be found in the ‘Facility Data’ section.
Note that the data guidelines document focuses primarily on timeseries-type data. If you require assistance in structuring alternative data types, please contact the Data Manager.
Data Upload
Data upload into HIEv occurs across two upload form pages. To begin the upload process, click on the `Upload’ button on the top left of the screen on most HIEv pages (Figure 1).
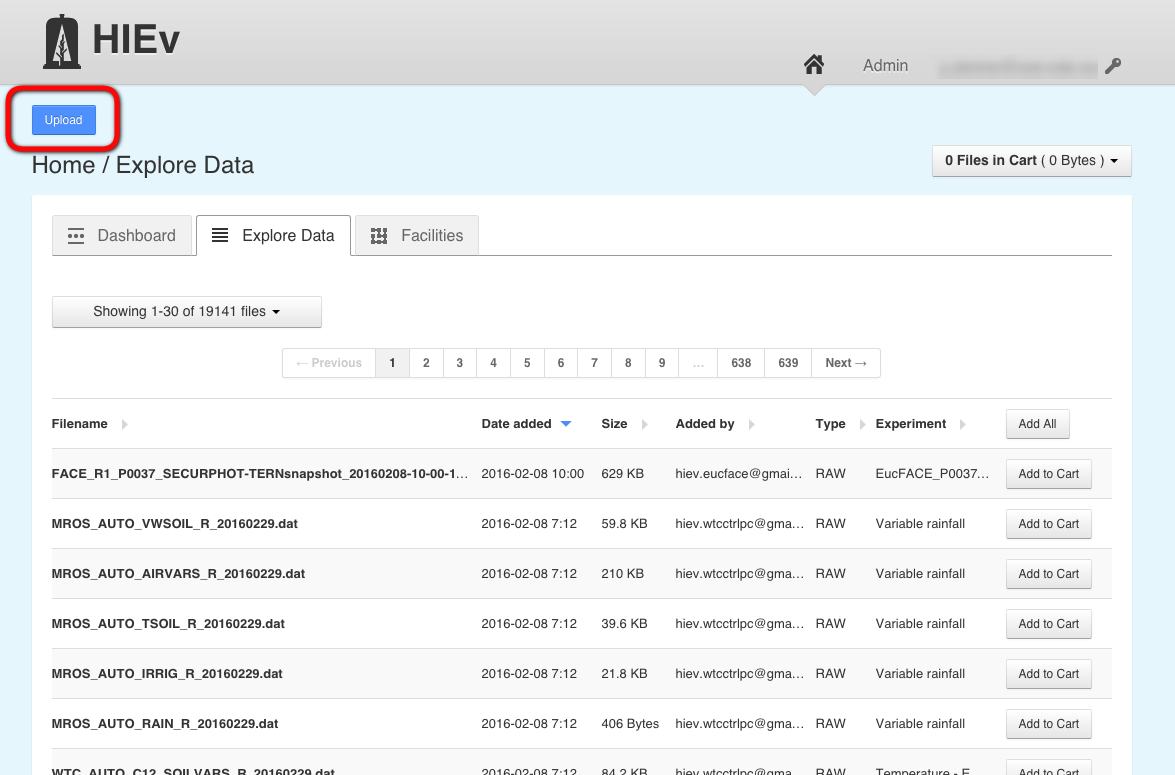
Figure 1 – Data upload button
This will open the initial ‘Upload’ screen whereby information describing the file being uploaded can be entered (Figure 2).
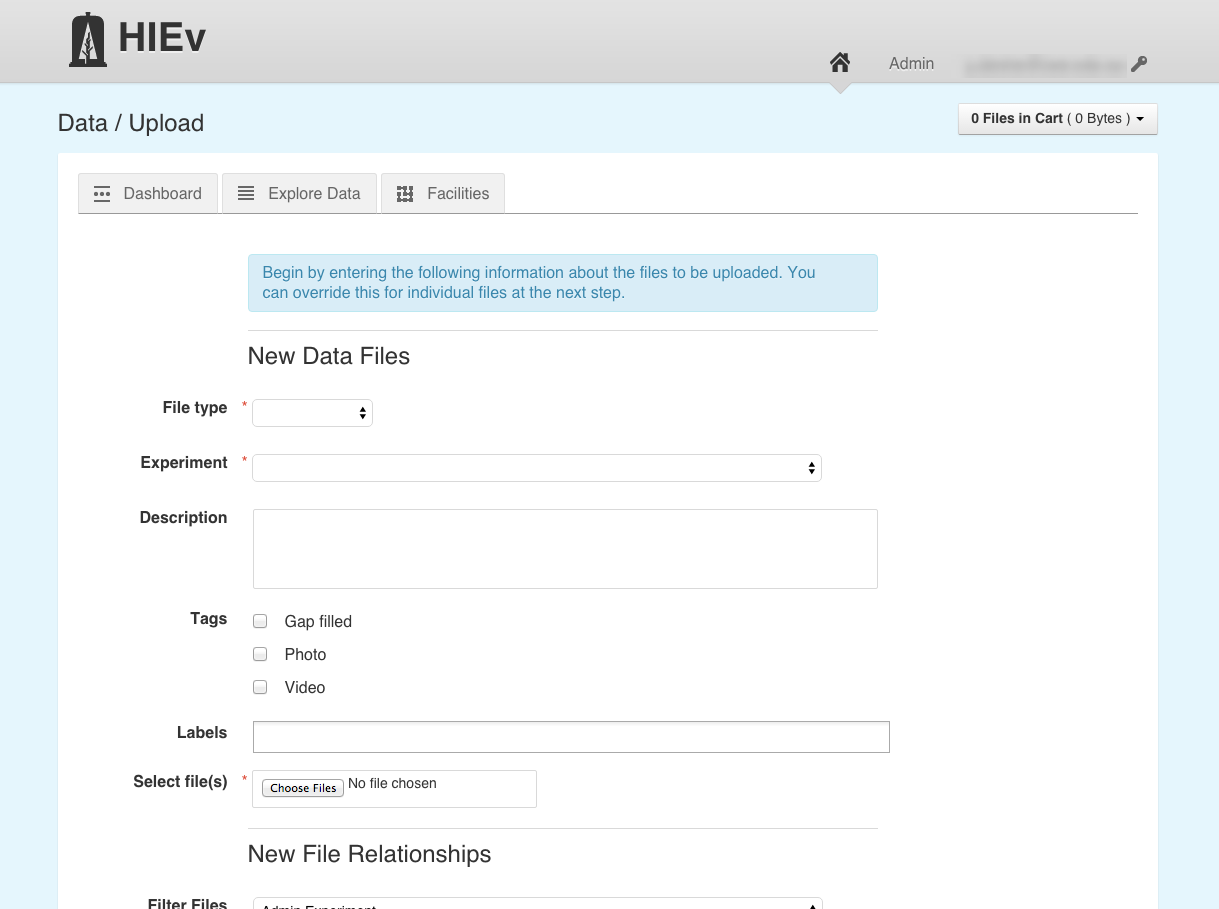
Figure 2 – HIEv data upload screen
Information entered here will support discoverability of the uploaded data via the HIEv search interface as well as aid understanding of that data during data reuse. It is thus important that information provided here is as complete and accurate as possible. Whilst individual form fields may not exist for every descriptive feature of the data, the ‘Description’ field is open text and can thus be used to provide full documentation of the dataset. The fields to be completed are:
- Type – What type of data is contained within the file, e.g `raw’ data from an instrument, `processed’ data output from an analysis script etc.
- Experiment – The HIE experiment under which the data was created. More information about experiments in HIEv can be found in the ‘Facilities/Experiments’ section.
- Description – A open text block description of the uploaded file. Users are free to enter as much information as possible here to fully describe the file.
- Tags – A limited set of descriptive identifiers that can be used to further categorise uploaded data.
- Labels – User-generated keywords for the uploaded data that can also help categorise data. Entering three characters in this field will expose any currently existing labels that can be reused.
- Creator – Choose who the primary creator of the dataset is from the dropdown list. This will default to the currently logged-in user but can be altered in the event that you are uploading the dataset for another researcher. Note that the creator can only be selected from users with an account on HIEv.
- Contributors – An open text block allowing you to list people who may have helped generate the dataset. It is expected that you include a first name, surname, and email address for each contributor, and ideally what organisation/institute they are affiliated with.
- Select file(s) – Use the ‘Choose Files’ to navigate to the file on the local system to be uploaded. This can be repeated in order to upload multiple files (assuming the supplied metadata is common to all files).
Users can also associate uploaded file(s) with files already resident in HIEv in the `New File Relationships’ section. There are many reasons to associate your uploaded file with other files (for example to link a cleansed data file to its associated raw data file). To add such a file relationship, you must first use the `Filter Files’ dropdown to select the experiment under which the existing file was uploaded. Having selected the correct experiment, you can enter the name of the file that you want to associate in the `Parents’ field (note that entering the first three characters of the filename will expose all matching files in a selectable list – see Figure 3). This step can be repeated to associate multiple files.

Figure 3 – Associating uploaded files with existing files
Once the upload page has been completed, click on the ‘Upload’ button to finalise the first step in data upload. If successful, the file will be uploaded into the system and a review page will open (with success message – Figure 4), allowing you to review and, if necessary, edit the current information as well as provide some additional information about the uploaded file:
- Access Control – Different access rights can be applied to the uploaded data. By default, access to the data is limited to all members of HIE (institutional users) with access denied to non-HIE researchers. Uploaded data can also be made available in addition to members of a particular access group.
- ID – Optional field to attach a user defined identifier to the uploaded data record.
- Start Time/End Time – Provide the start and end times of the actual data embedded inside the uploaded file. Note that for TOA5-formatted files the HIEv can automatically ascertain start and end times (see ‘TOA5 files’ subsection below).
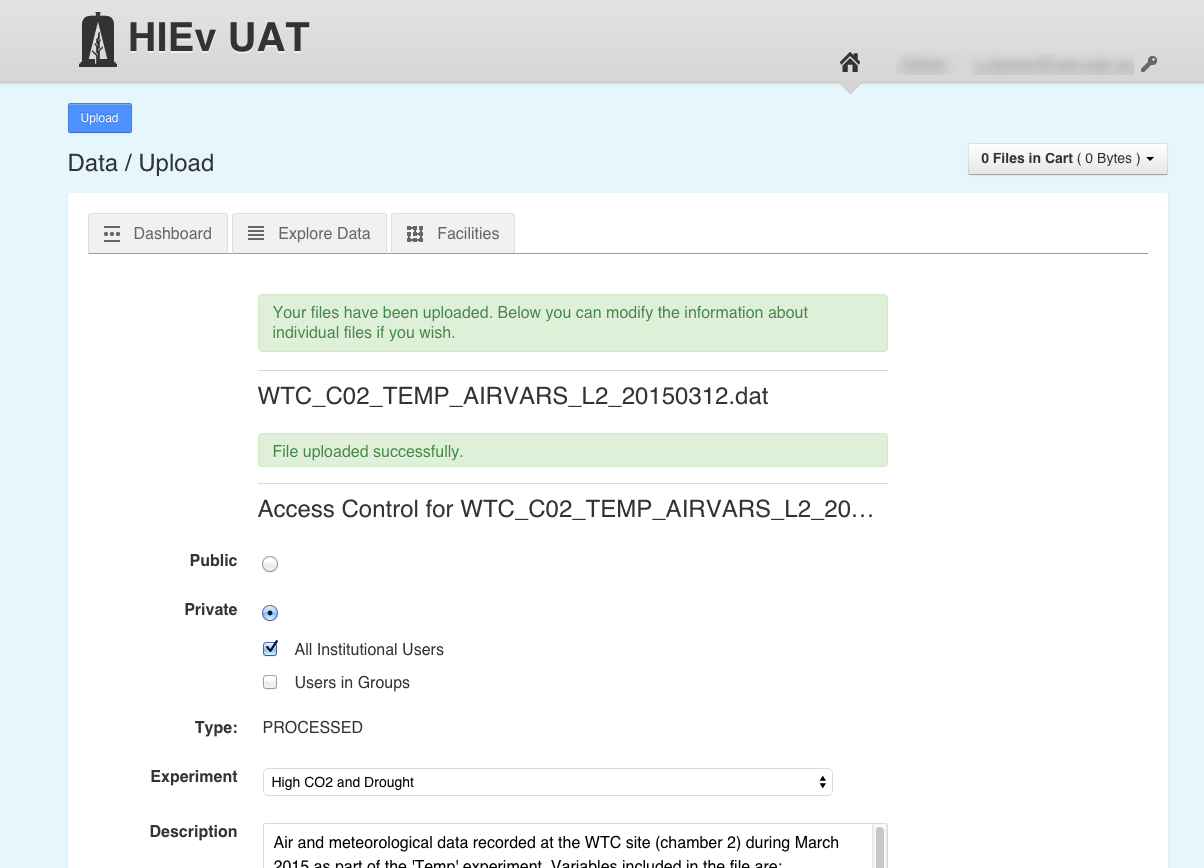
Figure 4 – Success message upon initial file upload
Editing uploaded records
Records in HIEv may be edited. This includes the metadata about the uploaded record and also the filename itself. To edit a record, first visit the individual record page. Then click on the ‘Edit Metadata’ button at the top of the page (Figure 5)
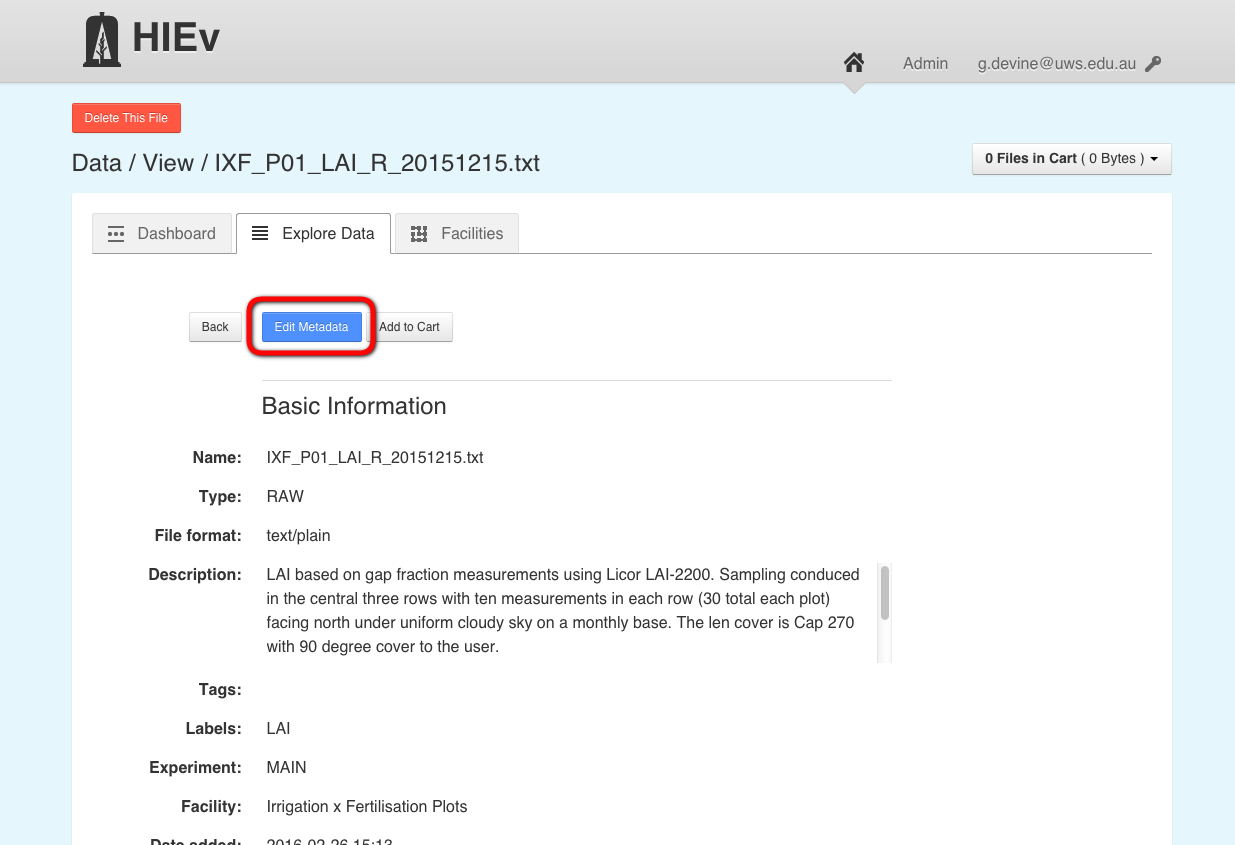
Figure 5 – ‘Edit Metadata’ button
Automated extraction of metadata
During upload of data a user will supply metadata to describe the file being uploaded. However, for certain file types the HIEv will enhance the description of a file through automatic extraction of file-level metadata. This currently happens for TOA5 data and image files.
TOA5 files
At HIE, a large number of files are automatically uploaded into the HIEv on a daily basis from the various sensor networks based at the HIE field facilities. The majority of these files are of a type called TOA5 files that contain ASCII header information and comma separated data. An example can be seen in Figure 6.
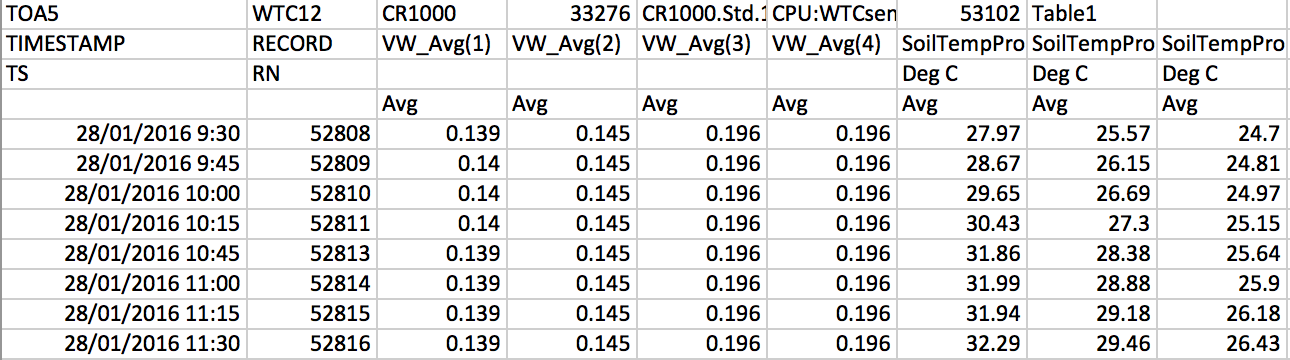
Figure 6 – TOA5 file structure (loaded in Microsoft Excel for clarity)
Typically TOA5 contains four lines of header, where the top line pertains to information about the logger, the second line contains the variable name of data in that column, the third line the units of that data, and finally the fourth line the measurement method (snapshot, averaged, total, etc). The data itself is typically timeseries data with a timestamp of each measurement given in the first column. Upon upload of a TOA5 file into HIEv, the HIEv will automatically extract the information in the file header as well as the start and end date/time of the data from the first column, and will appear on the metadata listing of that file (Figure 7). This information can subsequently be used when filtering/searching data in the HIEv.
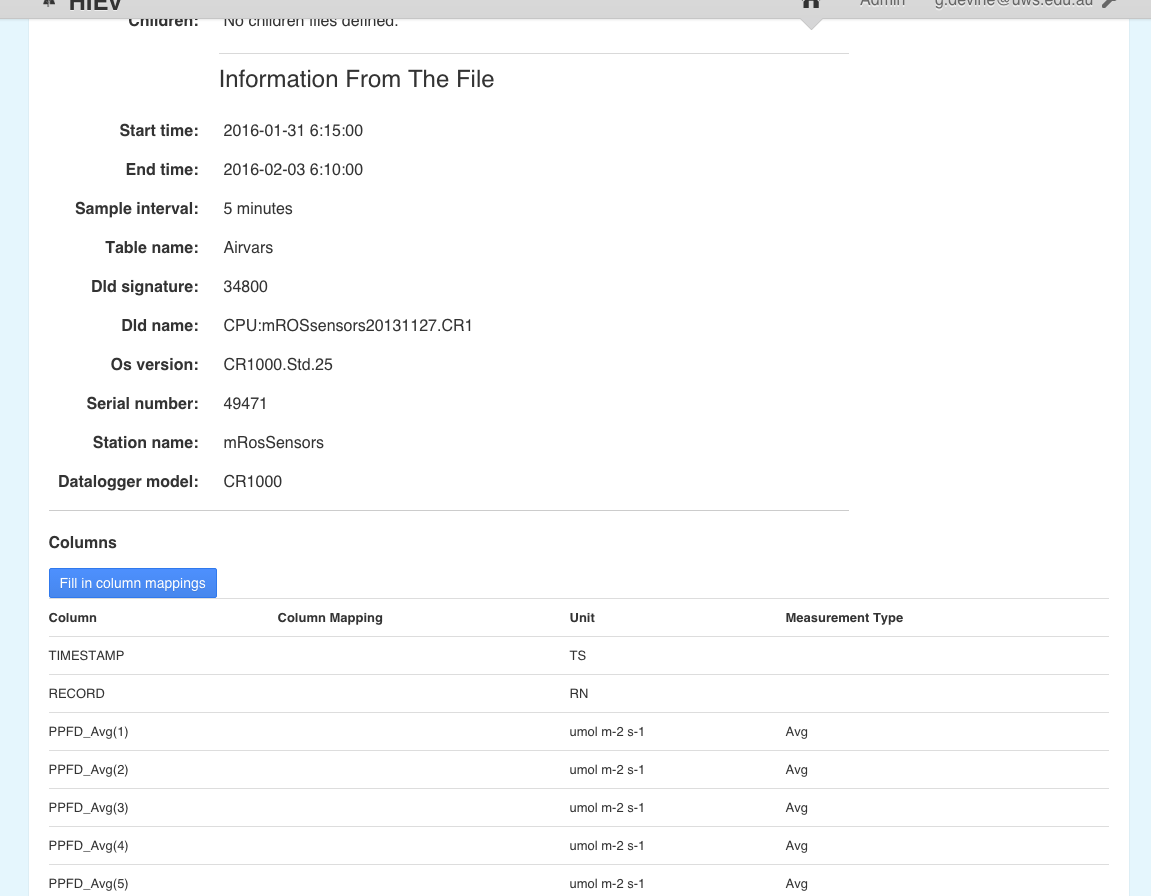
Figure 7 – Extracted metadata from an uploaded TOA5 file
Image/Photograph files
Today’s digital cameras record not only the date and time of a photograph, but also camera settings used to capture the photo. This information is stored with the photo in what is called EXIF metadata. EXIF metadata includes shutter speed, aperture setting, ISO setting, focal length etc. Upon upload of a photo, HIEv will automatically extract all available EXIF metadata and populate a set of bespoke fields in the file record (Figure 8). These fields can be subsequently used in the HIEv search filters to identify photos that match particular camera settings.
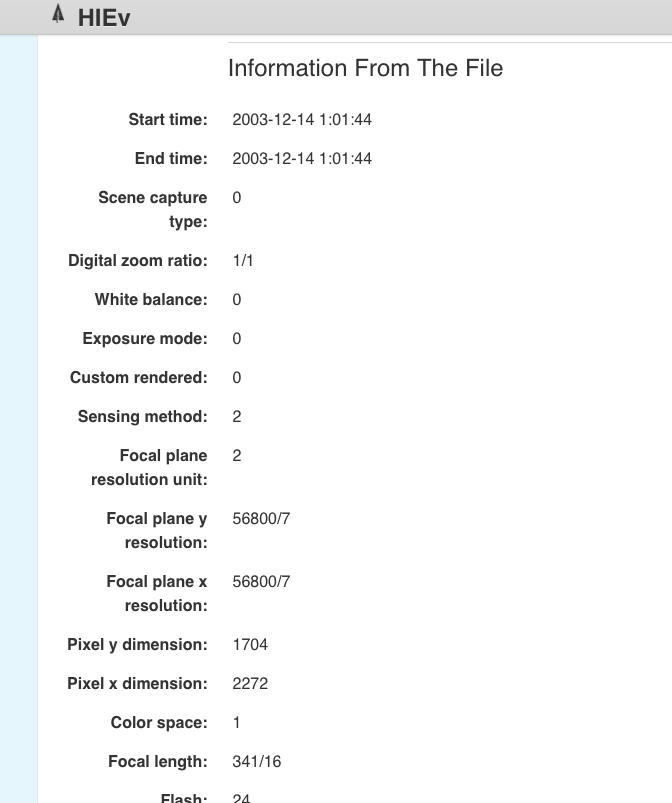
Figure 8 – Extracted metadata from an uploaded TOA5 file